

In this blog we will consider simple steps by which we can attach and mount a volume(elastic block store) to an ec2 instance. Following steps must be followed :
Step 1 -> Creating an ec2 instance
We will be creating a Linux instance (m4.large) which comes with Cent OS as the default operating system. Steps of creating an instance are clearly mentioned in official amazon docs, check here.
Step 2 -> Creating a volume
1) On the left panel of the ec2 console , click on volumes present under the heading ELASTIC BLOCK STORE.
2) Click on Create Volume button.
3) In the box that appears enter the size of the volume you want to attach in Size (GiB). And under the Availability Zone field, enter the same availability zone as of your instance.

The volume is created as its State changes from creating(yellow) to available (blue)
 .
.
Step 3 -> Attaching volume with the instance
1) Select the newly created volume by ticking its check-box. (Checkbox of only the volume to be attached must be checked).
2) Click on Actions then Attach Volume.
3) Specify the instance id of the instance with which you want to attach the volume under Instance field. And then click Attach.

With that a volume is created and attached to the ec2 instance and the state assosiated with the volume turns from available(blue) to in-use(green).
Step 4 -> Ssh to your instance
ssh to your instance via following command :
ssh -i “myPemFile.pem” ec2-user@PUBLIC_IP_OF_YOUR_INSTANCE.
Make sure you have given the read permission to your ‘myPemFile.pem’. You may give the permission via :
chmod 400 myPemFile.pem
Step 5 -> Mounting the attached volume to the “/mnt” folder of the instance
Mounting is the act of associating a storage device to a particular location in the directory tree. Following steps mounts the additional volume attached to our instance with the directry structure (/mnt folder) of our instance.
On the terminal of your instance, hit following commands sequentially :
1) lsblk
This command list all the available volumes and there Mount Point.
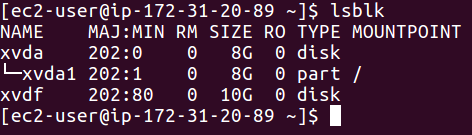
In the pic, xvdf is the volume that we attached with our instance. Since there is no mounting point for the instance, we cant use this volume. So now we mount the volume to /mnt folder of our directory structure
2) sudo mkfs -t ext4 /dev/xvdf
Output :

This command formats the xvdf volume and then create ext4 file system on it.
3) sudo mount /dev/xvdf /mnt
It mounts the xvdf to the /mnt directory. Mounting the external volumes with /mnt is just a convention you may mount it with any folder you wish. In case the folder of your choice dosent exist, create one before mounting via
mkdir my_fav_folder
4) lsblk
Output :
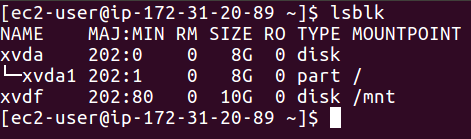
Now compare the output of lsblk with the image on the first step above and you will notice our instance now has /mnt as its Mount Point for external volume.
All the content stored under the /mnt folder is saved in the external volume that we attached.
Hope the blog helps you. Questions are welcomed.

2 thoughts on “Mounting EBS(Elastic Block Store) volume to EC2(Elastic Compute Cloud) instance.3 min read”
Comments are closed.