


In this blog, we will discuss what Apigee is and how we can create our own proxies. But before we get an understanding of Apigee, let’s discuss API first.
What is an API?
API is the acronym for Application Programming Interface, which is a software intermediary that allows two applications to talk to each other. Each time you use an app like Facebook, send an instant message or check the weather on your phone, you’re using an API.
To explain this better, let us take a familiar example.
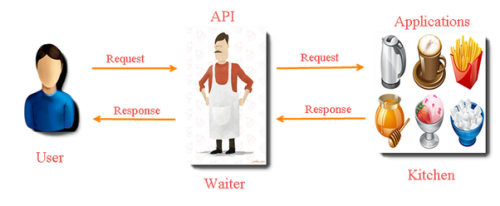
Imagine you’re sitting at a table in a restaurant with a menu of choices to order from. The kitchen is the part of the “system” that will prepare your order. What is missing is the critical link to communicate your order to the kitchen and deliver your food back to your table. That’s where the waiter or API comes in. The waiter is the messenger – or API – that takes your request or order and tells the kitchen – the system – what to do. Then the waiter delivers the response back to you; in this case, it is the food.
Our basic Model looks somewhat like this:

Drawbacks of this model can be:
- After a client app has been released that accesses any services, the service provider is then required to make sure that those services continue to work overtime as they add, modify, or delete those services. The service provider must also have a way to keep app developers aware of any changes to the services to ensure that client apps stay in sync with those services.
- Client app developers face challenges when trying to consume services from different providers. There are many technologies available today for use by a service provider to expose its services. The same client app might have to use one mechanism to consume a service from one provider, and a different mechanism to consume a service from a different provider. App developers can even face the situation where they have to use different mechanisms to consume services from the same provider.
Thus, to mitigate these drawbacks APIGEE comes up which makes services available, enables you to provide secure access to your services with a well-defined API that is consistent across all of your services, regardless of service implementation.
What is Apigee Edge?
- Apigee Edge is a platform for developing and managing API proxies.
- Think of a proxy as an abstraction layer that “fronts” for your backend service APIs and provides value-added features like security, rate limiting, quotas, analytics, and more.
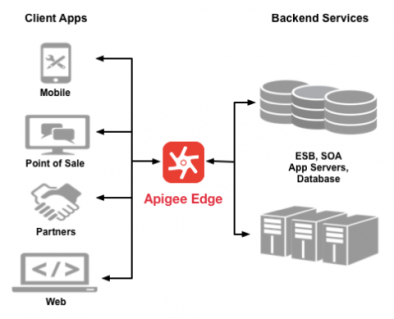
- Makes it easy for app developers to consume your services.
- Enables you to change the backend service implementation without affecting the public API.
- Rather than having app developers consume your services directly, they access an API Proxy created on Edge.
- The API proxy functions as a mapping of a publicly available HTTP endpoint to your backend service. By creating an API proxy you let Edge handle the security and authorization tasks required to protect your services.
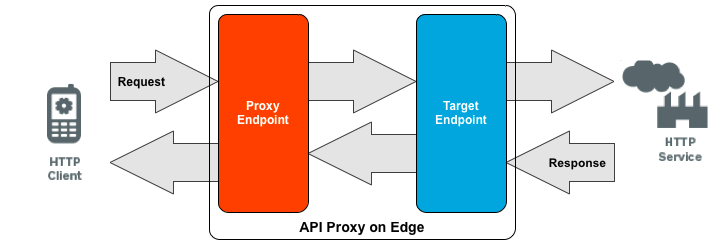
What is API proxy?
- The API proxy isolates the app developer from your backend service. Therefore you are free to change the service implementation as long as the public API remains consistent.
- For example, you can change a database implementation, move your services to a new host, or make any other changes to the service implementation. By maintaining a consistent frontend API, existing client apps will continue to work regardless of changes to the backend.
Two types of Endpoints in API Proxy
- Proxy Endpoint: Defines the way client apps consume your APIs. You configure the Proxy Endpoint to define the URL of your API proxy.
- Target Endpoint: Defines the way the API proxy interacts with your backend services. You configure the Target Endpoint to forward requests to the proper backend service
Let’s create an API Proxy
- Go to https://enterprise.apigee.com and log in. This is the Edge management UI.
- Click APIs in the top menu.

- Click on Add proxy present at the top right side of the snapshots below.

- In the Build a Proxy wizard, select Reverse proxy (most common), and click Next.
- Configure the proxy with the following:
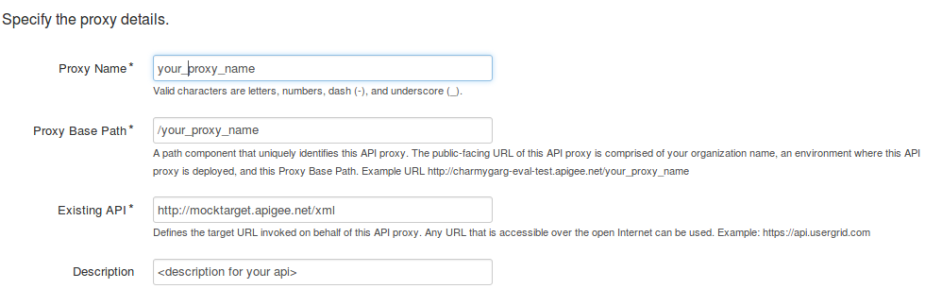
Note: The mocktarget service is hosted at Apigee and returns simple data. It requires no API key or access token. In fact, you can access it in a web browser. This defines the target URL that Apigee Edge invokes on a request to the API proxy. The /xml resource returns a sample XML response.
- On the Security page, select Pass through (none) as the security option, and click Next.
- On the Virtual Hosts page, click Next.
- On the Build page, make sure the test environment is selected, and click Build and Deploy.
- On the Summary page, you see an acknowledgment that your new API proxy was created successfully and deployed to your test environment.

- Click View proxy in the editor to display the Overview page for the API proxy.
Congrats!! You have created a proxy where you can add up policies which we will discuss in our next blog. Till then Stay Tuned and Happy Blogging 🙂
Hope you liked the blog!!
References
- Apigee Edge: What is Apigee Edge?
- Create the API Proxy: Constructing your own Proxy

2 thoughts on “Apigee 101: Constructing your own Proxy4 min read”
Comments are closed.