


We’ll learn how to make a REST API with API Gateway in this blog. Let’s start with a quick overview of APIs.
What is an API?
API stands for Application Programming Interface, and it is a software intermediary that allows two applications to communicate with one another.

What is an AWS API?
Amazon API Gateway is a fully managed service that makes it easy for developers to create, publish, maintain, monitor, and secure APIs at any scale.
APIs allow applications to access data, business logic, and functionality from your backend services through a “front door”. RESTful APIs and WebSocket APIs can be created with API Gateway to enable real-time two-way communication applications. Web applications, as well as containerized and serverless workloads, are supported by API Gateway.
Now let’s build a REST API Gateway.
Prerequisites:
- AWS Account
Creating a REST API using Lambda
Step1: Create a Lambda function
AWS Lambda is a serverless, event-driven compute service that lets you run code for virtually any type of application or backend service without provisioning or managing servers.
To connect it to the API gateway, go to AWS services and click lambda service to create a function. The Lambda function’s user interface is shown below. To proceed with the Lambda function creation, click the Create function button.

Now we have moved to create a functioning page.

Here,
- Author from Scratch: This allows us to create the lambda function completely on our own.
- Use a blueprint: These are language-specific samples that include function code as well as configuration options for a runtime and trigger combination.
- Container image: This allows us to select images to deploy for our application.
- Browse serverless app repository: Sample applications from the AWS Serverless Application Repository.
Choose Author from scratch from the above options and give a suitable:
- Function name: helloWorld
- Runtime: Python 3.9, choose any in which you want to write the function.
- Architecture: x86_64
- Permissions: Lambda will automatically create an executive role with the ability to upload logs to Amazon Cloud Watch Logs. When we add triggers, we can change the default role.

Step 2: Develop a function
It displays a message that the function helloWorld is successfully created.

The function overview allows us to see the:
- Triggers: AWS services or resources that invoke the function.
- Layers: resources that contain libraries, a custom runtime, or other dependencies.
- Destinations: AWS resources that receive a record of an invocation after success or failure.
We can see the code editor and a sample code that was generated automatically for our function if we scroll down the page.

We have a function called lambda handler that simply returns a message that says ‘Hello from Lambda!’.
The AWS Lambda console’s code editor allows us to write, test, and view the execution result of our lambda function code.
Step 3: Test the function
We must test this default code before using it. Clicking the Test dialogue box will take us to the Configure test event screen.
Here we can see some default test that is available. create a test by giving the name of the event.

Now that our function is complete, we can use Test to call the Lambda function, which will return a success message.

we can also see the summary for log output.

It displays basic information such as the execution time, build duration of 2ms, request-id, and so on. We can also run lambda functions a few times more to check metrics.
Step 4: Create a REST API Gateway
Return to the AWS management console and select API Gateway from the network and content delivery service list.
We can make four different types of APIs, but for this example, we’ll build a REST API.

We’ll create a new API with the name new-api, a description that’s optional and can be left blank, and the default Endpoint Type, which is Regional.

Click on Create API.

We can see a forward slash in the resource section, which basically represents the root level resource, which corresponds to the base path URL for our API.
Step 5: Create a Method
From the Actions menu, choose Create Method.

Choose to GET from the HTTP method drop-down menu. To save the setting, choose the check mark.
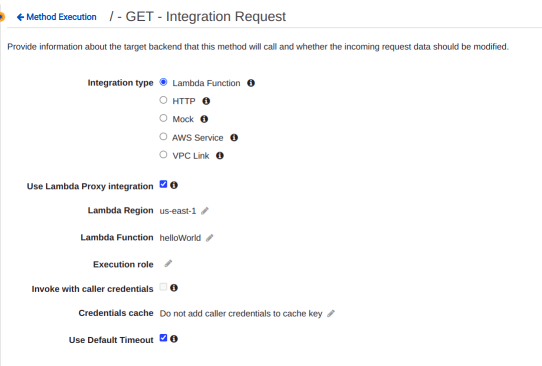
The GET pane gets open and by default, the Lambda Function option is been selected, keep the Use Lambda Proxy integration box checked, choose the region where we created the Lambda function, for example, us-east-1, and type the name of your Lambda function in Lambda Function that is helloWorld in our case, leave the Use Default timeout box checked.

Choose Save. Choose OK in the Add Permission to Lambda Function popup to have API Gateway set up the required access permissions for the API to invoke the integrated Lambda function.
Now we can see another Pane which is the GET – Method Execution Pane.

This pane consists of a number of items. If we select Method Request, it will present options like authorization and modification of the method request that is sent to the backend as an integration request. We’ll leave the value as the default.

If we select Integration Request, it represents the backend get request.
The Lambda box represents the backend Lambda Function that we created and if we click on this it will open the Lambda function in the lambda console.

Next is the Integration Response Box, which represents the response from the backend before it’s passed to the client as a method response.
Step 6: Deploy
Click on the Actions Drop-Down menu and choose Deploy API.

Click on Deploy.

We can see prod Stage Editor and the Invoke URL at the top.
If we choose to invoke the URL it will open a new browser and the default message that can be seen is “Hello from Lambda”.

CONCLUSION
So here we have learned How to Make a REST API Using API Gateway. To read more about DevOps.