


In this blog, we are going to talk about a very powerful yet simple way to represent an user identity securely during a two-party interaction. What I mean to say, when two systems exchange data we can identify an user without having to send private credentials on every request. But how it is possible? The answer is JSON Web Token. So, we are going to learn about what a JWT is? What is the basic structure of JWT and how it works?. At last we will see an example how actually a JWT is created at server side and use this at client side to verify each request made by an user.
What is JWT
JSON Web Tokens are an open and standard (RFC 7519) way to represent an user identity securely during a two-party interaction and the information is persist in the form of JSON object that is why we call it JSON web token. But why we need this? The answer is Authentication and Authorization. Many of us actually confuse among these two terms so, lets first relegate this confusion. Authentication means confirming your own identity, whereas authorization means being allowed access to the system.

JWT can contain user information in the payload and can use in the session to authenticate the user. Once authenticated, user will have the access to the protected resources in an application. The JWT included in the request and every request will be authenticated by verifying the JWT.
Structure of JWT
Well, if you want to see how JWT looks like lets have a look below,
eyJhbGciOiJIUzI1NiIsInR5cCI6IkpXVCJ9.eyJzdWIiOiIxMjM0NTY3ODkwIiwibmFtZSI6IkpvaG4gRG9lIiwiaWF0IjoxNTE2MjM5MDIyfQ.SflKxwRJSMeKKF2QT4fwpMeJf36POk6yJV_adQssw5cNo one can manipulate what actually it is and what information it contain after just read this. We can decode the above JWT using JWT.IO for that go to a link jwt.io, copy above jwt and paste it in the encoded section you will get the decoded part. Now we are aware about the structure of JWT and how it contain information.
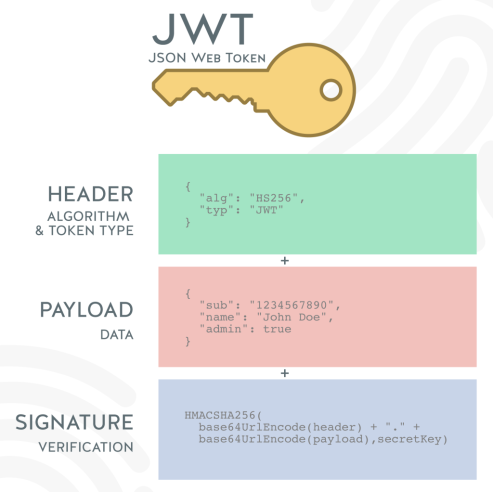
JSON web token consists of three parts:-
1) Header
2) Payload
3) Signature
and each part is separated by dot.
header.payload.signature Let’s have a look each part in detail
Header:  {
  "alg": "HS256",
  "typ": "JWT"
}
The header typically consists of two parts: the token’s type and the hashing algorithm.
Payload: {
  "sub": "65165751325",
  "name": "Rajat",
  "admin": true
}
The Payload, also known as the JWT claim, contains all of the information we want to transmit. There are standard claims which can found here and also we can create customized claims also.
Signature For the Signature part, we need the Header and payload in the encoded form and a secret key. we get the Signature in the following manner.
HMACSHA256(base64UrlEncode(header) + “.” + base64UrlEncode(payload), secret key) The secret is the Signature held by the server in order to verify tokens and sign new ones. The above Base64Url-encoded Header and Payload are combined with a dot, and then digitally-signed using the secret key. This generates the Signature as the third part of the our JWT
Combination of all the three “header, payload, and the signature”, generates a JWT token i.e.
const token = base64urlEncoding(header) + '.' + base64urlEncoding(payload) + '.' + base64urlEncoding(signature)How JWT works

let’s try to understand step by step what is happening in above diagram:
1. The user makes a login request with their credentials.
2. The server verifies if the user is legit and responds with a token containing the identity of the user.
3. The token in response is stored locally on the client system after that the user is allow inside the application.
4. When the user makes request for any resources in the application, token is added to the authorisation header and send to the server.
5. The server first checks if the request contains the token (responds with an error if not passed). Then verify the token , once done the authorised user will have the access of that particular resource.
This is same for all the other actions made by the user. When the user “logs out” or unauthorised the token removes from the browsers local storage.
Now, its time to explore JWT with an example i.e, how a JSON Web Token is actually create and validate at server side. The example is taken from maven project so we need a dependency in pom.xml file which is mention below.
<groupId>com.auth0</groupId>
<artifactId>java-jwt</artifactId>
<version>3.3.0</version>
JWT Generation
In the above code snippet to generate a JWT, HMAC SHA256 algorithm is use to sign the token with secret key. The payload contains Issue date, expiration date, an user ID and the Issuer name. Generated JWT will send as a response to the client side and stored in browser’s local storage. This JWT will going to attach to Authorisation header for each request made by user in an application. The content of the header should look like this:
Authorization: Bearer <token>The next step is validation, for that jwt token will be extracting from Authorisation header and pass it for validation. So let’s look into validation part.
JWT Validation
In the above code snippet to validate the jwt, same algorithm i.e, HMAC SHA256 and issuer “admin ” is used. If the token is corrupt or expired it will throw a JWTVerificationException i.e, authentication failed for the user to whom, token was assigned. So, the user have no access for the request he/she had made for.
Conclusion
After reading this blog we now have the basic idea about JSON Web Token and we have seen how it actually works with an example. JSON Web Token are a great and secure way of transmitting data between multiple parties. JWTs have signature and this fact makes it easier for everyone to easily identify the sender of information and for that we just need the correct key. There are many libraries available at jwt.io to implement this. we can use any of them as per our need. I hope this blog gives you a basic idea about how to implement a simple JSON Web Token Authentication in your application.
References
https://jwt.io/introduction/
https://blog.bitsrc.io/understanding-json-web-token-authentication-a1febf0e15
https://codinginfinite.com/authentication-java-apis-json-web-token-jwt/
http://www.differencebetween.net/technology/difference-between-authentication-and-authorization
