


Hi folks,
In this blog tutorial, we will learn how to create a BDD framework with Rest Assured. The BDD tool that we’ll be using is JBehave, as it is very much compatible with JAVA projects. On top of these, we will try to generate allure reports as well. So, let’s get going.
How to create a BDD framework with JBehave?
If you already have some experience with cucumber then it is going to be very easy for you. As you may already know, in BDD, we write tests in Gherkins syntax. Every step in the Gherkins links to a corresponding step definition. These step definitions contain the main logic of the test script. The Given, When and Then keywords are what we are going to play with while writing our test stories.
Before, moving ahead the first thing that we need to do is, we need to make our IDE recognise the .story extension. Just like in cucumber, we write our tests in the feature file. Similarly, in JBehave instead of the “.feature” extension we have “.story”. For this, we need to add a plugin to our IDE, in my case it is Intellij, the plugin name is “JBehave Support”. Once installed, restart your IDE and we are now good to add a .story file to our project.
Furthermore, we need to add JBehave and rest-assure dependent in our pom.xml file. The initial pom will be something like this
<?xml version="1.0" encoding="UTF-8"?>
<project xmlns="http://maven.apache.org/POM/4.0.0"
         xmlns:xsi="http://www.w3.org/2001/XMLSchema-instance"
         xsi:schemaLocation="http://maven.apache.org/POM/4.0.0 http://maven.apache.org/xsd/maven-4.0.0.xsd">
    <modelVersion>4.0.0</modelVersion>

    <groupId>org.example</groupId>
    <artifactId>jBehave-restAssured</artifactId>
    <version>1.0-SNAPSHOT</version>

    <dependencies>
        <!-- https://mvnrepository.com/artifact/io.rest-assured/rest-assured -->
        <dependency>
            <groupId>io.rest-assured</groupId>
            <artifactId>rest-assured</artifactId>
            <version>4.4.0</version>
            <scope>test</scope>
        </dependency>
        <dependency>
            <groupId>com.googlecode.json-simple</groupId>
            <artifactId>json-simple</artifactId>
            <version>1.1.1</version>
        </dependency>
        <!-- https://mvnrepository.com/artifact/org.jbehave/jbehave-core -->
        <dependency>
            <groupId>org.jbehave</groupId>
            <artifactId>jbehave-core</artifactId>
            <version>4.1</version>
            <scope>test</scope>
        </dependency>
    </dependencies>

    <properties>
        <maven.compiler.source>8</maven.compiler.source>
        <maven.compiler.target>8</maven.compiler.target>
    </properties>

</project>
The rest-assured and jBehave dependencies are self-explanatory. The third dependency, which is json-simple, is for modifying the JSON request that we are going to use for making the HTTP request via Rest Assured.
Overall, these are the only things that we’ll be needing to set up a BDD framework. Now, let’s move on and create our test script.
Writing tests with JBehave
As you may already know, we need to write our test in Gherkins syntax. The keywords used in Gherkins need to be linked to a corresponding step-definition. Since we have all these things cleared up, let’s write our tests in “.story” file.
This is the story file that I’ve used for this demo.
Meta:

Narrative:
As a user
I want to make a post HTTP request
So that I can add a new user

Scenario: Dummy Scenario
Given I provide the correct API URL
When I set the request body and make a POST request
Then I assert the successful status code, 201
The corresponding steps definitions look something like this.
package com.knoldus.steps;

import io.restassured.RestAssured;
import io.restassured.http.Method;
import io.restassured.response.Response;
import io.restassured.specification.RequestSpecification;
import junit.framework.Assert;
import org.jbehave.core.annotations.Given;
import org.jbehave.core.annotations.Then;
import org.jbehave.core.annotations.When;
import org.json.simple.JSONObject;

public class DemoSteps {

    private Response response;

    @Given("I provide the correct API URL")
    public void I_provide_the_correct_API_URL() {
        RestAssured.baseURI = "https://reqres.in/";
    }

    @When("I set the request body and make a POST request")
    public void I_set_the_request_body_and_make_a_POST_request() {
        RequestSpecification httpRequest = RestAssured.given();
        //setting request body
        JSONObject requestParams = new JSONObject();
        requestParams.put("name", "abc");
        requestParams.put("job", "manager");

        // specifying headers here, stating that the request body is json
        httpRequest.header("Content-Type", "application/json");
        // add the json body to the request payload
        httpRequest.body(requestParams.toJSONString());

        // Sending POST request
        response = httpRequest.request(Method.POST, "api/users");
    }

    @Then("I assert the successful status code, 201")
    public void I_assert_the_successful_status_code_201() {
        response.prettyPrint();
        // to capture response code through getStatusCode method.
        int status = response.getStatusCode();

        Assert.assertEquals(201, status);
    }
}
I believe these all things are self-explanatory. So, this is pretty much it. We can now run our story using the step-definition, where our rest-assured script resides, the will get executed. The only thing left is to write a runner java file and configure it to generate the report.
Generating Allure report
Firstly, we need a runner class that will run our story. JBehave’s documentation is very well structured, detailed and verbose. Hence, I didn’t find it much difficult to figure out the runner. Just like in cucumber, we need to define the cucumber runner using “cucumber.options”, similarly in JBehave we need to do the same thing. The runner code is mentioned below.
package com.knoldus.Runner;

import com.knoldus.steps.DemoSteps;
import io.tapack.allure.jbehave.AllureReporter;
import org.jbehave.core.configuration.Configuration;
import org.jbehave.core.configuration.MostUsefulConfiguration;
import org.jbehave.core.junit.JUnitStories;
import org.jbehave.core.reporters.StoryReporterBuilder;
import org.jbehave.core.steps.InjectableStepsFactory;
import org.jbehave.core.steps.InstanceStepsFactory;

import java.util.Arrays;
import java.util.List;

import static org.jbehave.core.reporters.StoryReporterBuilder.Format.CONSOLE;
import static org.jbehave.core.reporters.StoryReporterBuilder.Format.HTML;

public class DemoStory extends JUnitStories {

    @Override
    public Configuration configuration() {
        if (super.hasConfiguration()) {
            return super.configuration();
        }
        return new MostUsefulConfiguration()
                .useStoryReporterBuilder(new StoryReporterBuilder()
                        .withDefaultFormats()
                        .withFormats(CONSOLE, HTML)
                        .withReporters(new AllureReporter()));
    }

    @Override
    public InjectableStepsFactory stepsFactory() {
        return new InstanceStepsFactory(configuration(), new DemoSteps());
    }

    @Override
    protected List<String> storyPaths() {
        return Arrays.asList("Demo.story");
    }
}
The only change that I made is related to allure report generation only. In the configuration method, if you notice, I’ve added an extra line,
withReporters(new AllureReporter()));But before we add this, we need to modify our pom. We need to add a dependency of “allure-jbehave-reporter” along with an additional allure-maven plugin.
The dependency that I’ve used for this demo
<dependency>
    <groupId>io.tapack</groupId>
    <artifactId>allure-jbehave-reporter</artifactId>
    <version>0.1</version>
</dependency>
The allure maven plugin:-
<build>
    <pluginManagement>
        <plugins>
            <plugin>
                <groupId>io.qameta.allure</groupId>
                <artifactId>allure-maven</artifactId>
                <version>2.10.0</version>
            </plugin>
        </plugins>
    </pluginManagement>
</build>
And that it, the runner is ready along with allure report configurations. However, this is one major thing to note, all these pom.xml changes will not generate an HTML report, instead, it will generate an XML file that will have all the test execution details within.
Hence, we need to use this XML file and generate an HTML report out of it. This is where the allure-maven plugin comes into play. All we need to do is, just run a maven command mentioned below.
mvn allure:reportAnd voila, a new “site” folder will be created in the target folder. And inside the “site” folder, you can find the generated allure HTML report.
The generated report looks something like this.
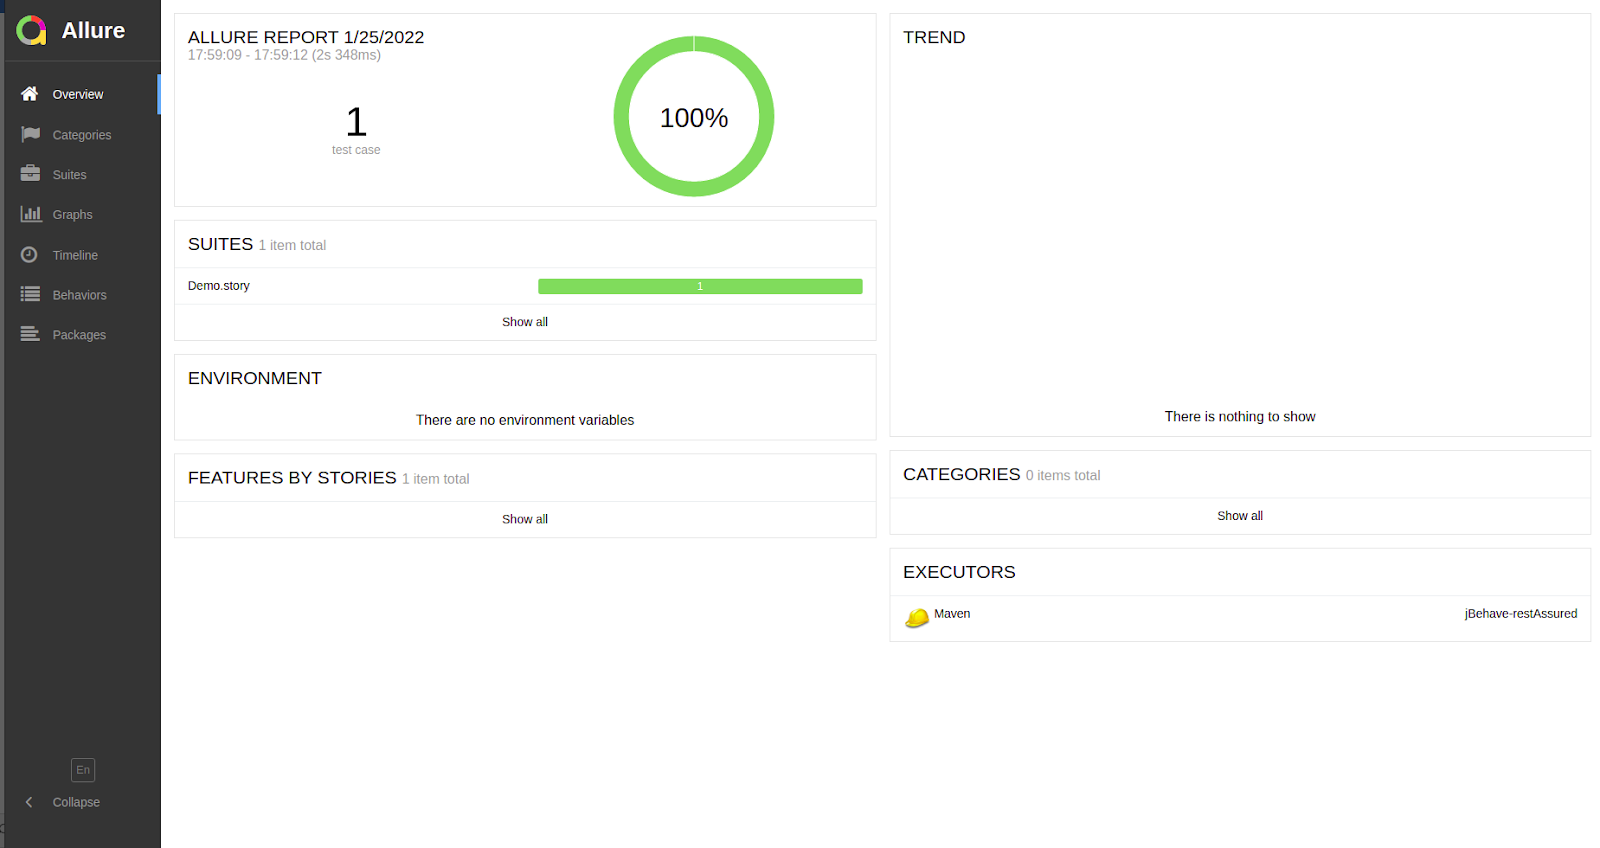
That’s all folks. I hope you may have found this useful. Thanks!