PostgreSQL is a powerful, open source object-relational database system with over 30 years of active development that has earned it a strong reputation for reliability, feature robustness, and performance.
Hello, folks! your wait is over, we have come up with a new blog. In this blog, we will discuss how we can incorporate the Postgres database using Rust programming language with the help of a sample example. I hope you will enjoy the blog.
PostgreSQL comes with many features aimed to help developers build applications, administrators to protect data integrity and build fault-tolerant environments, and help you manage your data no matter how big or small the dataset. In addition to being free and open-source, PostgreSQL is highly extensible. For example, you can define your own data types, build out custom functions, even write code from different programming languages without recompiling your database!
As you know we are going to incorporate Postgres with the help of Rust programming. So first we have to set up Postgres in the system.
Setup Postgres:
To install PostgreSQL, first refresh your server’s local package index:
sudo apt updateThen, install the Postgres package along with a -contrib package that adds some additional utilities and functionality:
sudo apt install postgresql postgresql-contribAfter installing the Postgres we have to create a role which we will use in the code as username to connect code with database:
sudo -u postgres createuser --interactiveEnter name of role to add: postgres
Shall the new role be a superuser? (y/n) yNow we have to configure the DBname and password:
sudo adduser postgresALTER USER postgres WITH PASSWORD 'new_password';Now we have to connect it to the database:
sudo -i -u postgres
psql
sudo -u postgres psql
psql -d postgres
You can also check your current connection by this command:
postgres=# \conninfoOutput:
You are connected to database "postgres" as user "postgres" via socket in "/var/run/postgresql" at port "5432".Now the setup is ready to connect with the Rust code .
Postgres with Rust:
First, we have to make a new Rust project for the Postgres with Rust. So I recommend clone over the content of the directory from the Github repository. I’ll go through each relevant part of the code.
In these files, the cargo.lock is the auto-generated file of the rust code. And the cargo.toml file is the file which can have all the dependencies related to our Rust code for incorporation of Postgres.
[dependencies]
postgres = "0.17.5"
Now we have another file main.rs in which we have incorporated rust code to interact with the Postgres database.
First we have to make connections with the database. For that we have to make connections with the database.
// Make connection with Postgres Database.
let mut client = Client::connect("postgresql://postgres:myPassword@localhost:5432/postgres", NoTls)?;
Now we have a client connection by which we can make operations on the database. It’s time to make the table in the database.
// Create the table in the postgres Database.
client.batch_execute("
        CREATE TABLE IF NOT EXISTS author (
            id              SERIAL PRIMARY KEY,
            name            VARCHAR NOT NULL,
            country         VARCHAR NOT NULL
            )
    ")?;

    client.batch_execute("
        CREATE TABLE IF NOT EXISTS book  (
            id              SERIAL PRIMARY KEY,
            title           VARCHAR NOT NULL,
            author_id       INTEGER NOT NULL REFERENCES author
            )
    ")?;
After generate the table in the database, we have to insert the data into that table:
    // Insert the values to the tables in the Postgres database.
    let mut authors = HashMap::new();
    authors.insert(String::from("Pawan Bisht"), "United States");
    authors.insert(String::from("Pankaj Chaudhary "), "India");
    authors.insert(String::from("Lokesh Aggarwal"), "Singapore");

    for (key, value) in &authors {
        let author = Author {
            _id: 0,
            name: key.to_string(),
            country: value.to_string()
        };

        client.execute(
            "INSERT INTO author (name, country) VALUES ($1, $2)",
            &[&author.name, &author.country],
        )?;
    }
You have successfully inserted the data into the Postgres database. Now we will fetch the data from the Postgres:
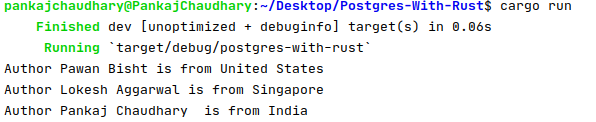
// Retrieve the data from the table.
for row in client.query("SELECT id, name, country FROM author", &[])? {
        let author = Author {
            _id: row.get(0),
            name: row.get(1),
            country: row.get(2),
        };
        println!("Author {} is from {}", author.name, author.country);
 }
You will be able to retrieve the data from the Postgres by the help of above code. It will print the data fetched from the Postgres.
Now we will see how we can delete the tables we have created in above code:
// Delete the table from the Postgres database.
client.batch_execute("
        DROP TABLE author, book;
")?;
Output:
Note: I hope our blogs help you to enhance your learning. I’ll post more blogs on Rust. Stay Tuned.
If you want to read more content like this? Subscribe Rust Times Newsletter and receive insights and latest updates, bi-weekly, straight into your inbox. Subscribe Rust Times Newsletter: https://bit.ly/2Vdlld7 .
Happy learning!!!